Tag Archives: fireplace renovation

First Fire in the Fireplace

Print pagePDF pageEmail page

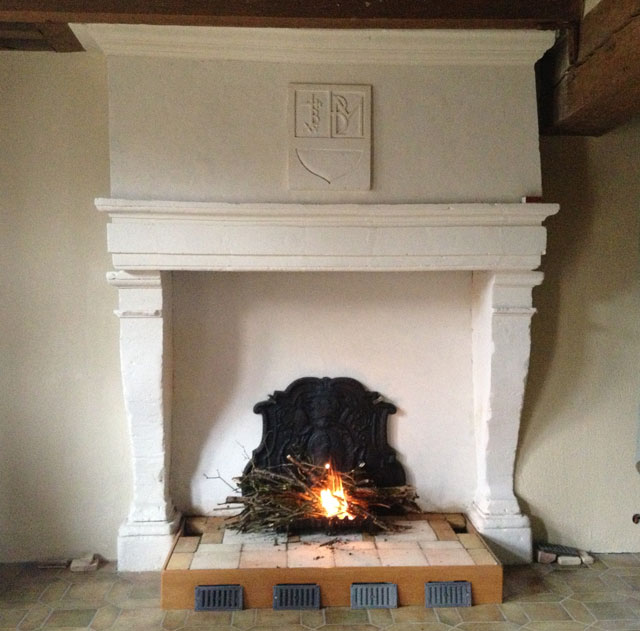
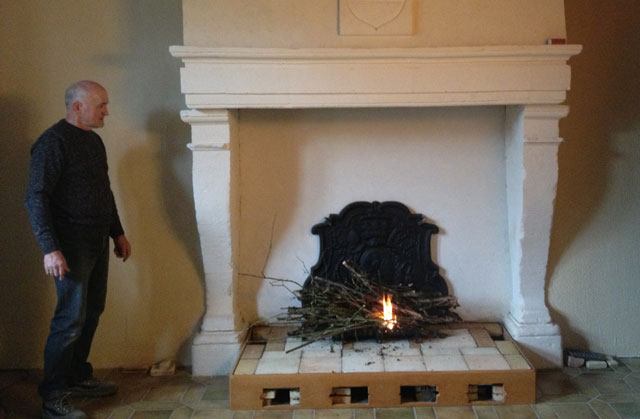
We’re at Closerie Falaiseau. We’ve had dinner and are sitting on the sofa in front of the non-operational fireplace downstairs . Why, you may ask, are we not upstairs, drinking champagne and eating foie gras in front of our beautifully renovated Renaissance fireplace. Well, the answer is simple. We’ve lit the first fire and discovered it smokes.

First fire
First fire

Mr and Mrs Previous Owner came over this afternoon after lunch so that Mr PO could help Jean Michel take the 150 kg fireback upstairs. It was an amazing operation and I have finally understood how a chain hoist works.

The manual chain hoist at the top of the landing

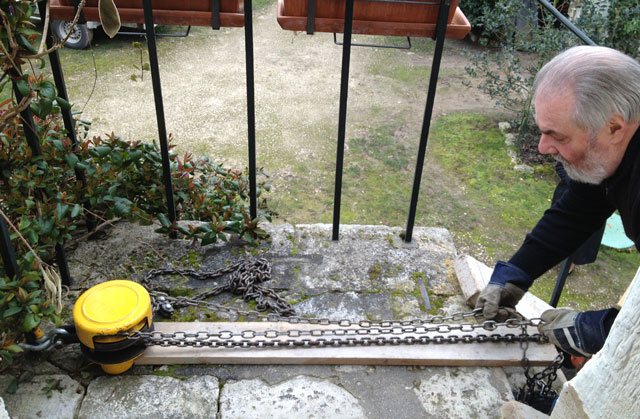
First, Jean Michel attached the chain hoist horizontally to the railing at the top of the steps (chain hoists are usually used vertically). Then he put a plank under the chain. After that, he put two thin planks on the steps.

The fireback being placed on the planks

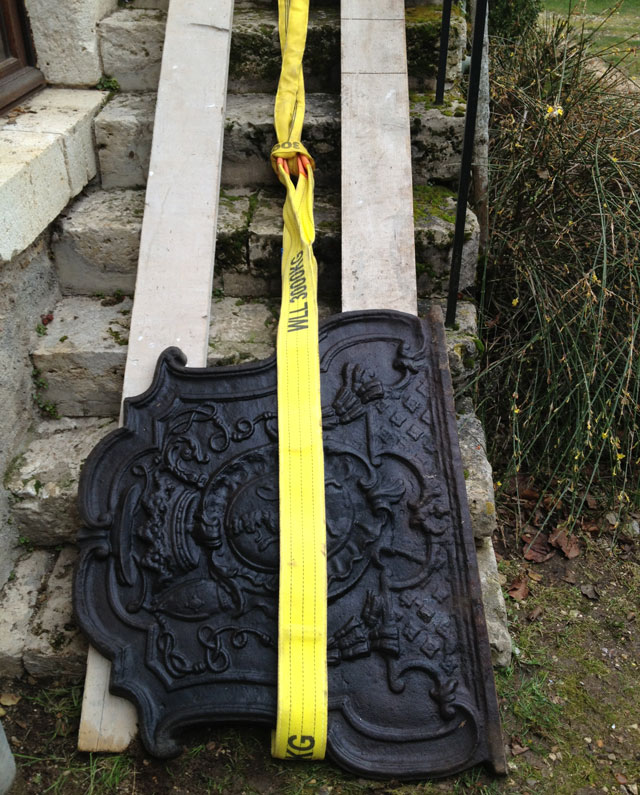
Mr PO and JM then lifted the fireback onto the first planks. JM put a super strong strap around it and attached it to the hook on the end of one of the two chain loops.

The fireback is now attached to the chain hoist

Mr PO, on the landing, started pulling one side of the other chain loop.  This turns a pulley mechanism inside the chain hoist housing. When the pulley turns, it lifts up the end of the other chain loop with the hook on the end. Pulling on one chain enables the hoist to increase the mechanical work that is being done. Now isn’t that clever?

The fireback starts its journey

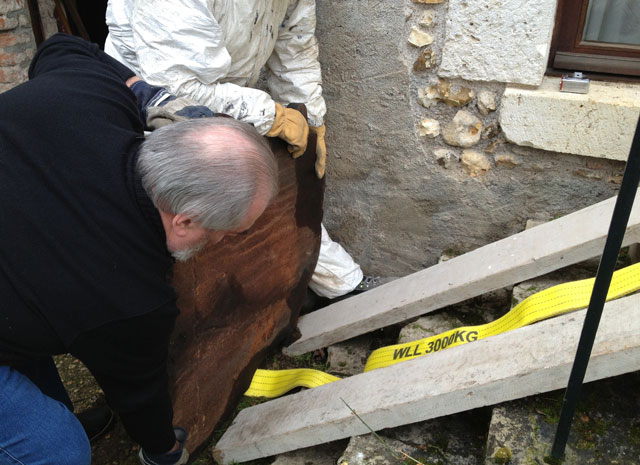
It was amazing to see Mr PO pulling on the chain loop while the 150 kg fireback slid effortlessly upwards. He did tell me not to stand at the bottom of the steps though, just in case the whole load crashed back downwards and crippled me forever.

Mr Previous Owner effortlessly pulling up the 150 kg fireback

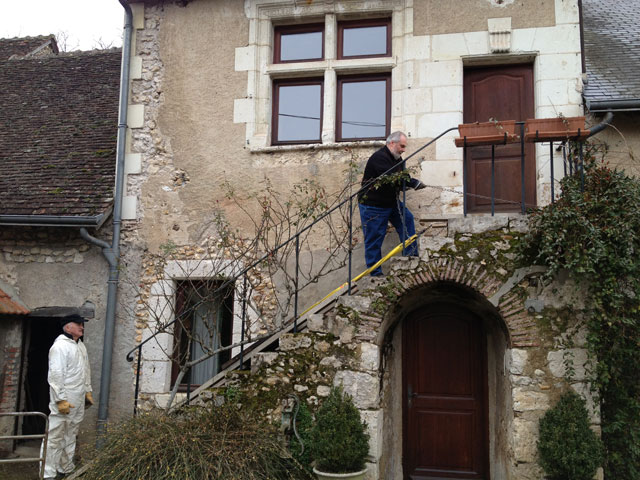
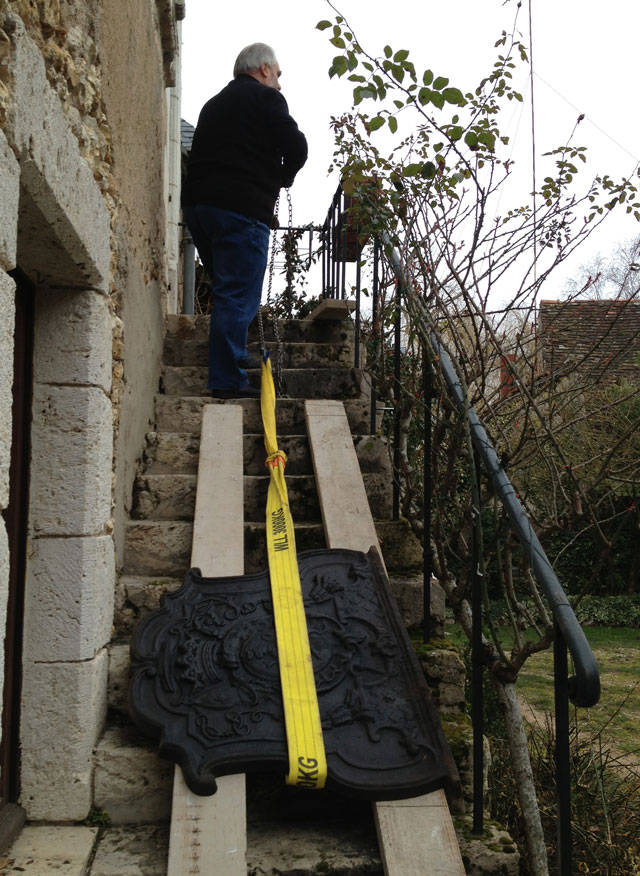
The planks weren’t quite long enough, so a little adjustment was needed halfway up and again when the fireback reached the top of the stairs.

Adjustment halfway up

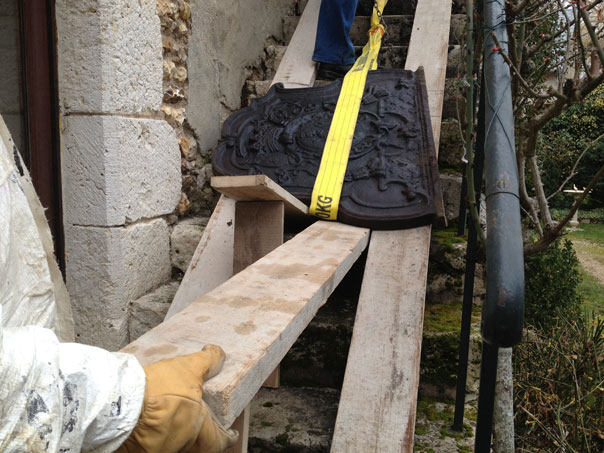
JM and Mr PO then had to lift it onto the landing. Using another set of planks they lifted and slid it upright into the room. I could see by this time that Mr PO needed a break so I forced JM to go downstairs and get the trolley so they wouldn’t have to lift it all the way across the living room to the fire.

The fireback in place

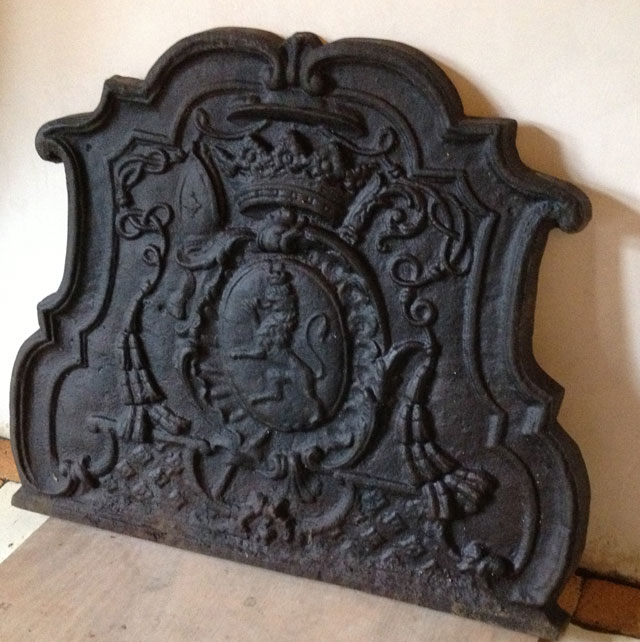
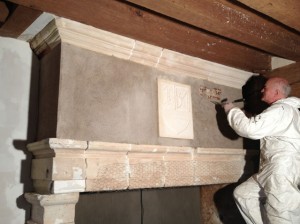
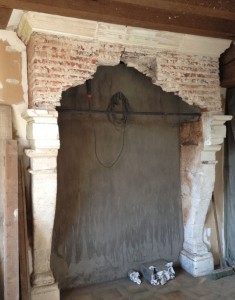
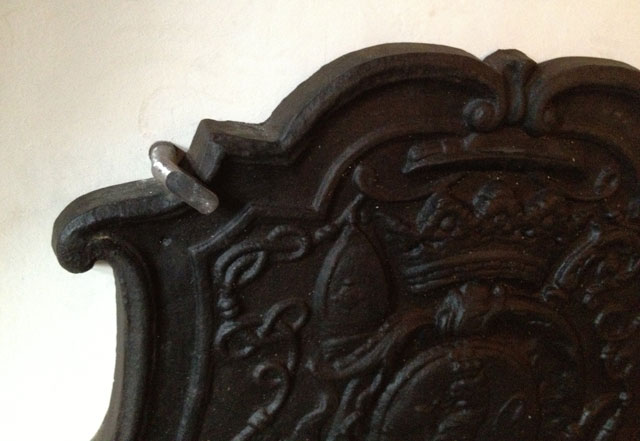
Just then, one of our neighbours went past on his bike so we called him up to help. That way, there were three men to carry the fireback across to the fireplace. Once it was in place, JM drilled a hole in the wall and screwed in the bracket he had made previously to stop the fireback falling forwards.

Home made bracket
Home made bracket

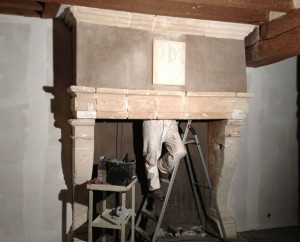
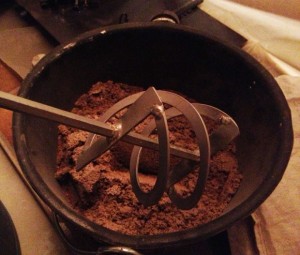
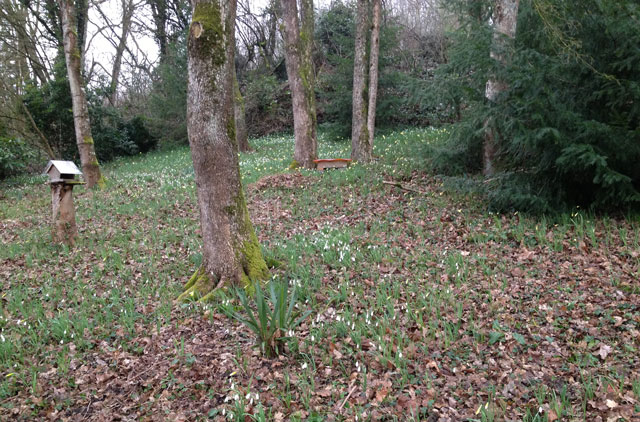
He then brought up some firewood from our little wood, which incidentally is now full of snow drops and budding daffodils, laid the fire and lit the first match.

Our wood with crocuses and daffodils
Our wood with snow drops and daffodils

It was a very moving moment and we were about to cheer when we realised that the room had started to fill with smoke. We opened the door to let it out, hoping it would soon go up the chimney. But it didn’t.

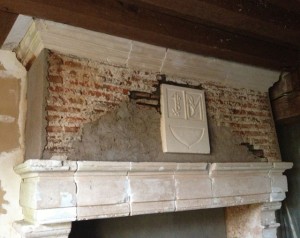
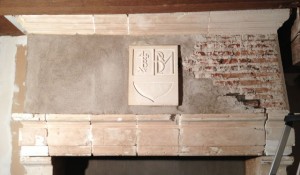
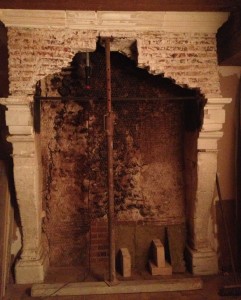
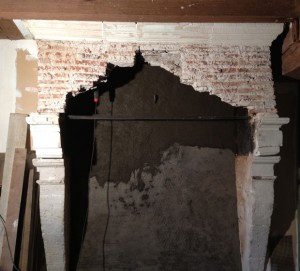
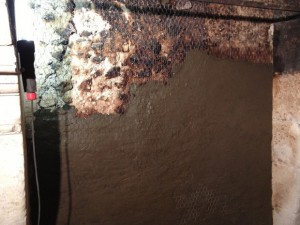
Jean Michel had suspected this might happen but thought we would just have to have a smaller fire, not no fire at all. You may remember the story of the delinquent owner who removed the crest stone when he had to sell the house. Well, the exact same person bricked up the top of the chimney, reducing it by one-third (we don’t know why), thus preventing the smoke from going up the chimney properly.

Jean Michel sadly surveying the smoke

The next step in the operation is to have the chimney opened up again. Tomorrow, we’re phoning the roofer so he can come and give us a quote. But I think the champagne and foie gras in front of the fire might have to wait until next winter! Sigh.

French Renovations in the Loire Valley

Print pagePDF pageEmail page

I thought I would use my guest post on My French Life this month to do a recapitulation of the renovation of our Renaissance fireplace in Closerie Falaiseau, our 400-year old house in Blois. I know that some of you waited with bated breath as we converted it from a “bandy-legged monster” as Barb Hall so aptly called it in a comment, to a straight and dignified fireplace ready to use. 

The hearth looks a bit stark at the moment but once the fireback is in and the logs are in place and there’s a roaring fire going, it should look a bit more attractive!

French Renovations in the Loire Valley

posted on My French Life, the global community of French and francophiles connecting like-minded people in English & French

_myfrenchlife_maviefrancaiseThe first time we visited Closerie Falaiseau, a beautifully restored Renaissance home built in 1584 near Blois in the Loire Valley, we didn’t see the upstairs fireplace. It was almost completely covered up with a large wardrobe.

So on the second visit, we asked if the cupboard could be moved. But it was very heavy and we only had a partial view. It was not until we signed the final deed of sale and saw the house empty that we had any real idea of the state of the fireplace and even then, it turned out that a large rattan fan was hiding a gaping hole filled with cement. Read more


More Progress on the Fireplace

Print pagePDF pageEmail page

Relationnel said today that if he’d known how long the fireplace was going to take, he’d never have started the renovations. I’m not convinced though. I somehow can’t see him going to stay in a gîte somewhere else in France to enjoy an open fire when we are the proud owners of a 400-year old house with no less than four fireplaces. He might have started the refurbishment earlier though …

Mantle with rendering on one side

He has been working full speed for three days. The mantle is now more or less ready to take the whitewash. He’s had to reconstruct it inside and outside, requiring large amounts of refractory mortar and bits of brick and a lot of skill and patience. We had hoped to be able to renovate the stone but it is really quite damaged and would take weeks and weeks to restore. It has also been painted various pink and ocre shades over the centuries so whitewash seems the best solution.

The right wall before painting

Having spent the first two days getting all my translations out of the way, I was finally able to contribute to the renovations today. Although there is rendering on the other walls of the room, the two panels on either side of the fireplace had been left unfinished, covered by a large bookcase on the right and a large cupboard on the left. Another cupboard stood in front of the fireplace. The previous owner left the bookcase on the right as it is almost an exact fit but the other side is completely bare.

Paint roller with bucket and grating

Relationnel decided that if we were going to do renovations, we had to do them properly, including rendering on both walls. So that is my job. Today, I did the undercoat, an easy though tiring job because I’m not used to stretching my arms above my head, getting up and down a ladder to dip my roller in the paint, getting down on all fours to finish off the bottom, etc.

Fraussie putting on the primer

I donned my throwaway overalls and put plastic bags over my shoes to protect them and used the cap that I won with Carolyn Barnabo at the barbecue quizz we attended last year at the Australian Embassy in Paris. I always knew it would come in handy. Relationnel demonstrated how to put paint on the roller and I was off.

The mantle with only the right side to go

We used to have our house repainted regularly when I was a child in Townsville by professional painters and I certainly don’t remember ever seeing them use paint rollers. I don’t know when they were invented, but they are certainly a big improvement over those large brushes I used when I did my first paint job thirty years ago.

Relationnel does the last bit of rendering

Also, that water-based paint is a real boon. When you’ve finished, you just have to wash it all off the brush, roller (though since it was a cheap-O one so we threw it away), paint bucket and grid thing. The only disadvantage is that in winter, cleaning everything outside with no running water is a bit of a bind. It was easier when we painted the front gate in the heat wave last summer.

Left wall after priming

But Relationnel said I did a good job so I went off to make lunch while he did some more mortaring. We finally sat down at 2 pm by which time I didn’t want to move another inch. I asked Relationnel how long it would take to dry. “Oh, you can put the rendering on this afternoon if you want.” No way. I had a nap instead. I’ll attack that tomorrow!

The current state of the fireplace

The Fireplace is Not Finished

Print pagePDF pageEmail page

The fireplace is not finished. Relationnel has gone back to Paris without me because the balcony in the Palais Royal is not finished either. We will not be welcoming in the New Year with a glass of champagne and homemade foie gras in front of a blazing fire. Unless we postpone New Year until the fireplace is finished. Which is what I think we might do. It might be less depressing.

Back of the fireplace with chicken wire over a very uneven surface

You may remember that the last time Relationnel left Closerie Falaiseau, the back of the fireplace was lined with chicken wire, waiting to be covered with refractory mortar. Given the slow progress up until then, he decided to take a week’s holiday so that he could finish it completely. I was so pleased to have him back again after 10 days that I immediately offered to help with the mortar.

I got dressed in my coveralls, shoe covers and surgeon’s gloves while Relationnel got the mortar ready. None of this measuring bit. He just tipped the powder into a trough and then added water au pif, as the French say (pif is slang for nose). He mixed it round and it eventually had the right consistency. It looked deceptively easy.

Trowel and smoothing rectangle

Then he demonstrated how you hold up a large trowel at right angles to the wall, then with your other hand, you use a smaller trowel to somehow push the mortar onto the wall and flatten it on over the chicken wire. Ten minutes of that had me in tears. Not only didn’t my mortar stick but my whole body was hurting.

My gardening stool for time out

I put my trowel down and went over to have some time out on my gardening stool for a while. I watched Relationnel and tried to learn his technique. The first thing I realised was that he had shown me the technique for right handers. Which I’m not (although I later discovered that my relative ambidextrousness was very handy).  I went back and tried again, this time using a large plastic rectangle with a handle on the back instead of the trowel. It made a big difference, I can tell you. By some miracle, the mortar then started to stick. Well, some of it anyway, but it seems that professionals drop a lot along the way as well. You just scoop it up and put it back again.

Mortar 2/3 finished
Mortar 2/3 finished

We worked steadily on and I started to feel more on top of things, particularly as we got past kneeling level and I could sit on my gardening stool which relieved my back and hands no end. Relationnel suggested I try mixing up the next batch of mortar. The bag was so heavy I couldn’t lift it so he tipped it in then added some water. I couldn’t even stir the mixture with the trowel it was so stiff so I set to with my hands.

Paint blender
Paint blender

It was worse than mixing the Christmas cake. The cement and water eventually penetrated the surgeon’s gloves and became cold and sticky so Relationnel came to the rescue. It seemed a bit ludicrous not to have some sort of beater to make the process easier. When I mentioned this to Relationnel, he suddenly remembered that he had an attachment for mixing paint. He had to buy some mason’s pails first and use a really big drill, but the attachment didn’t break and it reduced the mixing time amazingly.

To cut a long story short, we finished the first section, using a large ruler to make sure it was even and smoothing it all out with my plastic rectangle. I have to confess that I thought the whole operation was pretty dicey considering the unevenness of the walls. I was pretty amazed at the result.

Mortar almost finished

However, when we started the next section the following day, I found the mortar very stiff and had a lot of trouble getting it to stick on the wall. In the end I managed to get it on and when we finished the first layer of the second section, Relationnel came over to smooth my side down as I didn’t have enough strength in my wrists. As soon as he touched it, it all just peeled off, like marzipan on a cake. I was devastated.

That set off another flood of tears. I was particularly worried that what I had done the day before was going to peel off at some future point in time but Relationnel reassured me. In fact, after mixing up the next batch of mortar, he realised that it needed to be more liquid. I tried again with the new mortar, getting him to check that it was OK all the time, but in fact, it was fine.

After completing the visible part of the back of the fireplace in a total of three sections, I then looked after the last smoothing and evening operation, which fortunately was very successful so I was slightly mollified. Relationnel was was very proud of me.

More completely finished
Mortar completely finished and smoothed

That night I practically cut the tip off of my small finger cutting up pumpkin which put paid to any further contribution and seriously disabled me for 48 hours as I could no longer touch type correctly. I’m sure you want to know what happened next, but I am going to keep it for the next episode!

The Kitchen Sink

Print pagePDF pageEmail page

Relationnel is arriving this afternoon with the kitchen sink. Well, almost. I wish he was. I am taller than the average Mrs Frog, unfortunately, which means that most sinks are way too low for me. It wouldn’t matter if I had a dish washer, but that is the one major item missing from Closerie Falaiseau and short of putting it in the bathroom (and that would not pass muster with my gîte guests now, would it?), it will continue to be missing until the kitchen is renovated in a couple of years time, at the same time as the addition of a very large bay window, complicated by the fact that the walls, you will remember, are about 70 cm thick. But I want light and a view of our wood.

The kitchen sink in Blois – I would like the bay window on the right of the small window

What Relationnel is bringing, though, is the electric knife sharpener (why do knives become blunt so quickly?), my sewing box (someone’s going to notice that coming-down hem soon), a couple of warm pullovers (so I can wash my only woollen cardigan) and the second cheap-O espresso maker (because pieces keep coming off the one here and my extragently expensive one now lives in Paris without me).

He’s also bringing the fireback for the renovated fireplace which he bought in Baie de Somme through leboncoin.com on Monday. I was so sad not to go with him but it seemed a little silly to take the train to Paris (1 ½ hours) then go another 2 ½ hours by car and back again. So I’m waiting eagerly to see the monster  which is a metre wide and weighs over a hundred and fifty kilos.

Leonardo’s company closing file is also coming down, sadly. I can’t believe it’s not finished yet but the Court wrote to say there were some things missing and a couple of errors. But Relationnel is also bringing the flowers Leonardo sent to me just as I was leaving Paris last time – the florist suggested delaying delivery until Relationnel could bring them down to Blois as it seemed a bit dicey to take them on the train with me.

Last year’s Christmas cake fresh out of the oven

More importantly, the Christmas cake tin and ingredients will arrive tonight as well, though only Relationnel and I will be around to stir and make a wish, an unavoidable break in tradition this year as the cake is already late. I should have made it last time I went back to Paris. Of course. But I was too busy trying to close Leonardo’s company.

Taking the temperature of our home made foie gras

Apart from that, Relationnel is bringing all the materials needed to finish the BIG FIREPLACE OPERATION so we can wish in the New Year in front of a blazing fire, sipping vintage champagne and eating homemade fois gras (if we ever find the time to make it!). It could take a while to unpack from the trailer when he arrives. Then we’ll go out and celebrate our anniversary!

If you would like to be notified of subsequent posts by email, just sign up under “Subscribe” in the column on the right. And please feel free to comment!

The Big Fireplace Operation – Stage 2

Print pagePDF pageEmail page

To the untrained eye, the current state of the fireplace may not seem any different from the last time I posted. However, another 5 days’ work put has been been into it!

The fireplace today

Now fireplaces are more complicated today than there were in the past for a very simple reason. Fires need air which used to be supplied by draughts from windows and doors. With the invention of double glazing and airtight seals around doors, there’s nowhere for the air to come in. So the fire smokes. The remedy – adding an air intake at the back of the fireplace – is not quite so simple in an old house with 70 cm walls.

First hole drilled through wall

However, Relationnel already has wall-drilling experience from installing the washing machine which used to empty out into the downstairs shower, so he attacked the wall with great gusto. It now has the necessary air intakes though it took two operations. The other thing you need in a chimney today is a hatch affair called a trappe in French. I don’t what it’s called in English.

Relationnel with his soldering gear

Its aim is to seal up the chimney when you’re not using the fire and to regulate the air flow when you’re using it. Since our four-hundred year old chimney is not at all standard, Relationnel had to make the trappes (three of them because of the width of the chimney and the fact that he’s doing this single-handed). This involved a lot of cutting and soldering of frames and plates that caused a couple of black-outs.

Looking up at the frame of the trappe

Once the trappes were in place they needed painting with special, ultra-sticky fire-resistant black paint. This is where I contributed my savoir-faire from painting the front gate this summer. It was a good thing that I had a throw-away overall with a hood or I’d have had to cut my hair afterwards. As it was, my rubber gloves kept sticking to the paint jar. But I did a wonderful job while Relationnel got on with some more skilled labour.

Me about to paint the trappe in my XL overalls

The next step was to decide on the design of the sole or hearth. Currently, there is just tiling which obviously isn’t ideal. I immediately rejected the idea of a metal plate as being inesthétique. We’ve inherited some otherwise very expensive refractory bricks from the Previous Owner but there are all shapes and sizes. Six reasonably ugly air vents also have to be incorporated somewhere so Relationnel lugged up the bricks and we set to work.

Designing the hearth with refractory bricks

After some slight initial friction due to my total ignorance of how these things work, we found a pattern we both agreed on. The whole thing will be raised to a total of 18 cm and despite appearances the finished result will be at the same height and those little holes will be filled in with half bricks. There’ll be an air vent on each side and the others vents will be in the thickness of the sole which will be entirely surrounded with an oak frame like our bedroom fireplace.

Large trappe before painting

We then moved onto the next stage, to which I contributed with slightly less efficiency, though I was very good as sorting the big nails from the little nails. Not that I really understood why they were mixed up anyway. I’m sure they should be in separate compartments. At the end, my fingers were covered with a sort of grey metal dust.

We had to attach a sheet of chicken wire to the back of the fireplace which is made of an assortment of materials including totally nail-resistant stone, crumbly wattle-and-daub, bricks and mortar. My preference goes to the mortar. You’re supposed to attach the chicken wire by driving nails halfway in, then banging their heads over to one side. Yes, well.

I was rather slow because I didn’t want to accidentally hammer my thumb. I did, however, manage to acquire a certain technique with the wattle-and-daub and mortar and Relationnel was pleased with the result.

He’s gone back to Paris now so I don’t know when we’ll be able to resume the work. The next stage is covering the chicken wire with a thick layer of refractory mortar, to which I shall also be contributing. I’ll be wearing shoe covers as well, I’d say.

No news from Mr PPO, by the way.

The Big Fireplace Operation and a Delinquent Seller

Print pagePDF pageEmail page

The Big Fireplace Operation is obviously taking longer than expected, but that is no surprise. Renovations always take longer than expected. First, Relationnel underestimated the size of the fireplace itself. Second, it turns out that someone along the way used it incorrectly resulting in a thing called bistre which is a brownish substance made of burnt soot and tar and can burn your house down if not removed.

Fireplace with bistre

Bistre is removed by tapping away with a pickaxe. You may remember that I moved down to Blois temporarily to escape the renovations on my balcony in Paris. Well, it’s the same sort of noise. My office is just next door. I do not, however, have to listen to a radio blasting away and workmen shouting at each other. And there are no pneumatic drills.

Triangle after chipping off facing, showing metal bar

Before removing the bistre, Relationnel also chipped off the facing of the upper part of the fireplace, above the mantel, revealing a triangular-shaped hole. He had previously propped up the sunken mantle which had been erroneously reinforced with a horizontal bar by someone who obviously didn’t realize (I’m sure I would have …) that the metal would expand when the fire was lit and push the sides of the fireplace further, causing the mantle to sink even further.

Mason’s trestles being installed to hold up mantle

At this juncture, a visit to BricoDepot was needed to buy some bright orange mason’s trestles. I must have been really desperate to get out the house to go on that excursion! First, you identify what you want in a catalogue, then you pay for it. You get one of those little raffle tickets that you give to the warehouseman when it’s your turn. He takes you to the storage area and unloads your purchases onto a large trolley. Then you get his mate to stamp your raffle ticket. You can tell why it’s the cheapest DIY place around.

After removing the keystone

The mason’s trestles are needed so that Relationnel can remove the mantle, which consists of several large stones with plaster holding them together, in preparation of the next phase. The sides of the fireplace also needed to be sanded down to remove various layers of paint. That also produced a somewhat unnerving noise.

Keystone with a piece of plaster fallen off

In the meantime, we got a call from Mr Previous Owner whom we had told about the Big Fireplace Operation. You know that big, square jagged hole above the mantle? Mr PO told us it happened when the crest stone with the construction date of the house – 1584 – was removed for renovation. The stone was damaged beyond repair. I always thought that was a bit strange because none of the fireplaces are in working order. Anyway, he had a new crest stone made by a stone cutter’s school  somewhere along the way using a photo of the original and gave it to us when we got the keys to the house.

Fireplace with mantle removed

Well, it turns out to be a little more complicated. It seems that Mr Previous Previous Owner had to sell the house because of his divorce and wanted a keepsake – SO HE REMOVED THE CREST STONE. Can you imagine that anyone who loved historical buildings enough to buy Closerie Falaiseau and undertake its entire renovation would destroy its very soul? The man is delinquant.

Fireplace with hole where the crest stone was removed

Mr PO, who has remained in contact with Mr PPO for some reason, phoned him and asked him if he would return the crest stone to us since we’re renovating the fireplace . Mr PO believed he was going to do so, but when Relationnel spoke to Mr PPO on the phone, he said he wasn’t ready yet and would have to check we were restoring the fireplace correctly! What utter cheek !

New crest stone with 1584 just visible

We also learnt that Mr PO was able to have the new stone made from a plaster cast of the old one which turned up in the house next door, owned by Mr PPO’s brother who no longer owns his house either.Mr PPO was supposed to come by today but he obviously didn’t. Relationnel says there is no way he is going to set foot in the door without the stone. I agree of course. So we’re going ahead and using the new stone as planned.

Related Posts Plugin for WordPress, Blogger...